Loading... Please wait...
 Categories
Categories
- Home
- KITS
- BEAD WEAVING
- RUSSIAN CHAIN STITCH BRACELET INSTRUCTIONS DOWNLOAD (1 unit)
RUSSIAN CHAIN STITCH BRACELET INSTRUCTIONS DOWNLOAD (1 unit)

, $9.99 (https://landofodds.com/russian-chain-stitch-bracelet-instructions-download-1-unit/))

Product Description
Russian Chain Stitch Bracelet
Instructor: Warren Feld
Intermediate Level
--Bead Weaving Sequence
--Lesson: Turn traditional Petersburg Chain Bracelet into a Rope; Chain Stitch
--Bracelet
BW1-14-PCROPE
Kit with Instructions on CD or CD Instructions Only
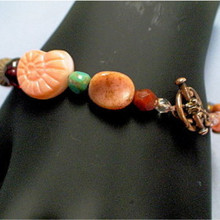
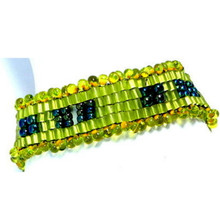
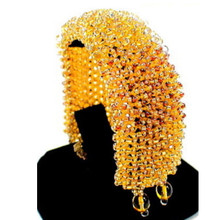
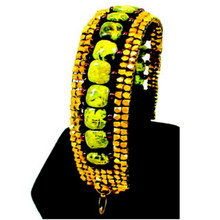
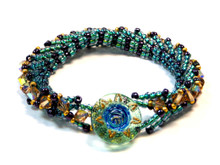
Simple elegance! Stitch the Petersburg Chain and Simple Russian Chain techniques to encase a cascading array of sparkling Austrian crystal beads within this rope bracelet.

NOTE: Regular retail and wholesale store discounts do not apply to kits.
View Warren as Guest Artist on JTV.com Jewelry Television's show "Jewel School"
as he discusses this specially adapted projects for Jewelry Television.
Petersburg Chain Rope Bracelet
The RUSSIAN CHAIN STITCH BRACELET KIT
Instructions to make a 6 1/2 - 7" bracelet
Supplies to make up to an 8 1/2" bracelet
|
PLEASE NOTE: Sometimes, because of erratic supplies of beads and other materials, we will need to substitute something of similar color and quality.
Palette #1: Mint Julep
|


Colors may appear differently on different monitors.
Palette #2: Aqua Mist
|


Colors may appear differently on different monitors.
FORMAT OPTONS
(1) KIT with Instructions on CD
(2) CD Instructions Only
(3) Digital Download Instructions
About the Kit...
I was at a point in time where I had to develop a new Petersburg Chain project for our classes. The Traditional project, I felt, had been done to death, and while very appealing, it was no longer anything special. The project had to be relatively simple, yet elegant and sophisticated, and truthfully, had to be more appealing than the traditional project design. So, I used a more prominent bead to connect the two strips, then turned this project into a rope by connecting the sides together.
I am very focused on redefining bead weaving stitches in architectural terms. At the core, this means determining what about the stitch is supportive of “shape”, and what about the stitch is supportive of “movement, drape and flow.” It became clear that every pair of Petersburg Chain Stitch rows is connected with what functions as a “box joint”. Based on this understanding, I developed a simple Chain Stitch, also relying on the architectural properties of a “box joint”. I used this simple Chain Stitch to connect the two sides of the bracelet into a rope.
In this RUSSIAN CHAIN STITCH BRACELET Project...
What You Will Learn:
- How to do the Petersburg Chain Stitch and a Simple Russian Chain Stitch
- Understanding how a chain stitch architecturally can be seen as a series of connected “joints”, each “joint” structurally serving to maintain shape and allow movement
- How to create and attach a simple button clasp assembly
TimeFrame:
This bracelet takes about 6 hours to complete
TABLE OF CONTENTS
SUPPLIES LIST, p. 4
- I. Planning Your Project, p.6
Intro – Types of Choices To Be Made In This Project, p.6
ABOUT PETERSBURG CHAIN, p.7
MANAGING SUPPORT SYSTEMS AND OTHER ARCHITECTURAL ISSUES, p. 7
THE CHAIN STITCH, p. 8
IA. Conceptualizing Your Piece, p.9
IB. Measurement, p. 11
IC. Selecting Materials, p. 13
ID. Sketching a pattern or graph, p. 13
IE. Identifying Potential Areas of Weakness, p. 14
IF. Identifying How To Attach The Clasp, p.14
IG. Visualizing Your Process, p.15
IH. Organizing Your Work Space, p. 16
- II. Beginning Your Project, p. 17
IIA. Basic Steps, p.17
IIA-1. CREATE THE STRIPS, p. 18
IIA-2. CONNECT THE STRIPS, p. 23
IIA-3. TURN INTO A ROPE, p. 30
IIA-4. ATTACH THE CLASP ASSEMBLY, p.34
- IIB. Dealing with Contingencies, p.41
IIC. Finishing Touches, p.42
- III. Summary of Learning Objectives You Have Met After Accomplishing This Project, p.43
- IV. Next Steps, p. 48
IVA. Suggested Readings, p. 48
LEARNING OBJECTIVES
| LEARNING OBJECTIVES BEAD WEAVING | RUSSIAN CHAIN STITCH BRACELET | ||
|
| BEGINNER | INTERMEDIATE | ADVANCED |
| TECHNICAL MECHANICS | |||
| 1. Selecting Materials | BEGINNER |
|
|
| 2. Positioning Your Fingers and Hands, and Holding Your Piece To Work It | BEGINNER |
|
|
| 3. Working with Thread, Waxing Thread, Managing Thread Tension | BEGINNER |
|
|
| 4. Finishing Off Threads in Piece or Extending by Adding Threads | BEGINNER |
|
|
| 5. Working with Beading Needles and Tools Used in Bead Weaving | BEGINNER |
|
|
| 6. Reading Simple Pattern, Figure and/or Graph | BEGINNER |
|
|
| 7. Identifying Areas of Potential Weakness, and | BEGINNER |
|
|
| 8. Determining Measurements, including Width and Length of a Piece, Especially In Relationship To Bead Sizes | BEGINNER |
|
|
|
| |||
|
| |||
| UNDERSTANDING CRAFT BASIS OF STITCH | |||
| 1. Starting the Stitch | BEGINNER |
|
|
| 2. Implementing the Basic Stitch | BEGINNER |
|
|
| 3. Working Stitch in Flat Form | BEGINNER |
|
|
| 4. Increasing and Decreasing |
|
|
|
| 5. Creating Simple Surface Embellishment |
|
|
|
| 6. Creating a Simple Edging or Fringe |
|
|
|
| 7. Finishing Off Your Piece With A Clasp Assembly | BEGINNER |
|
|
| 8. Working Stitch in Tubular Form | BEGINNER |
|
|
| 9. Working Stitch in Circular Form |
|
|
|
| 10. Working Stitch in Spiral Form |
|
|
|
| 11. Working Stitch in Diagonal Form |
|
|
|
| 12. Working Stitch in 3-Dimensions (sculptural or cubic) |
|
|
|
| 13. Working Stitch To Create Open (Negative Spaces), and Split Forms |
|
|
|
| 14. Embellishing the Surface of Your Piece |
|
|
|
| 15. Elaborately Embellishing the Project, including Fringes, Edge Treatments, Bails, Straps and Connectors |
|
|
|
|
| |||
|
| |||
| UNDERSTANDING ART & DESIGN BASIS OF STITCH | |||
| 1. Learning Implications When Choosing Different Sizes/Shapes of Beads, or Using Different Stringing Materials |
|
|
|
| 2. Understanding That Materials Differ in Terms of Whether They Will Mix in the Same Piece, They Will Work Well With Certain Stringing Materials, or They Will Work Well With Certain Bead Weaving Stitches |
|
|
|
| 3. Understanding Relationship of this Stitch in Comparison to Other Types of Bead Weaving Stitches |
|
|
|
| 4. Understanding How Bead (or Finding or Stringing Material) Asserts Its Need For Color, Using This Stitch |
|
|
|
| 5. Creating Your Own Design with This Stitch, in Reference to Design Elements and Jewelry Design Principles of Composition – Such as Rhythm, Orientation, Balance, Distribution, Parsimony -- Achieving Good Unity Of Purpose |
|
|
|
| 6. Creating Shapes, Components and Forms with This Stitch, and Establishing Themes |
|
|
|
| 7. Anticipating Issues of Movement, Drape, Flow, and Durability | BEGINNER |
|
|
| 8. Building in Structural Supports, and Other Support Elements, into the Design | BEGINNER |
|
|
| 9. Strategically Integrating 2 or More Types of Stitches Within the Same Piece | --> Product ReviewsFind Similar Products by CategoryRelated Products | ||