Loading... Please wait...
 Categories
Categories
CRYSTAL EXCITEMENT BRACELET INSTRUCTIONS DOWNLOAD, (1 unit)

, $9.99 (https://landofodds.com/crystal-excitement-bracelet-instructions-download-1-unit/))

Product Description
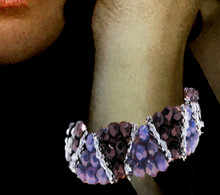
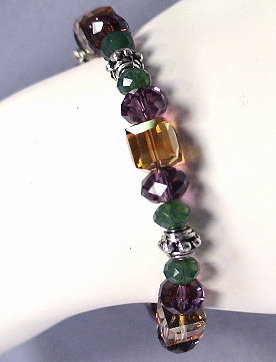
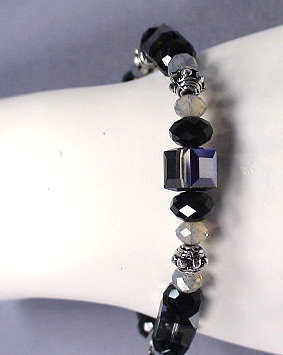
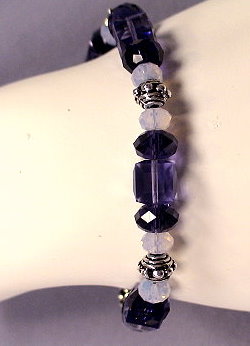
Crystal Excitement Bracelet
Designer: Warren Feld
BS1-01
BEGINNER LEVEL
-- Bead Stringing Sequence
-- Lesson: Stringing with Cable Wire and Crimp Beads
-- Bracelet
Strut your bling with crystals! Elegant and exciting, this bracelet will show-case your jewelry-making talents. Learn Bead Stringing using cable wire and the crimping technique.
NOTE: Regular retail and wholesale store discounts do not apply to kits.
The CRYSTAL EXCITEMENT BRACELET KIT
Instructions to make a 7" bracelet
Supplies to make up to an 8" bracelet
|
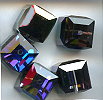
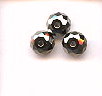
Palette 1: Mardi Gras (Crystal Copper)
|


Colors may appear differently on different monitors.
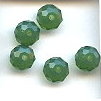
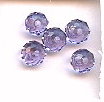
Palette 2: Heliotrope
|

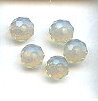
Colors may appear differently on different monitors.
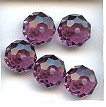
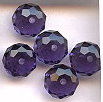
Palette 3: Purple Velvet
|
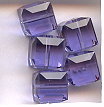
Colors may appear differently on different monitors.
FORMAT OPTONS
(1) Instructions Digital Download
About the Kit...
Stringing beads on cable wire, thread or cord is not difficult, but it does require a thorough understanding of the pros and cons of the various parts and stringing materials that you will use.
The bead stringer has several goals to achieve: You want your piece to
a. Look good and be appealing
b. Last, not break and be durable
c. Move well as it is worn
d. Feel good and drape good as it is worn
e. Withstand all the forces and pressures that result, when your jewelry moves, as it is worn
f. Fit the context within which it is worn
For our Crystal Excitement Bracelet, we will be using flexible, nylon coated cable wire. The quality of cable wire we will be using is called Flex Wire, which is the middle-range or Designer grade in this product line. [The low-end of the cable wire line is called Tiger Tail].
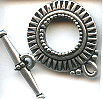
We will be attaching the wire, using crimp beads, to a Toggle Clasp -- basically a ring on one end and a bar on the other. From a functional standpoint, the Toggle Clasp is considered the best clasp. It is considered the easiest to get on and off, and the most secure. It has no moving parts. It has great "jointedness" or support. Toggle Clasps should always be bought and used as a set. You never mix and match rings and bars, because they are tightly engineered to work as a set and you don't want your necklaces and bracelets to fall off, when worn.
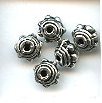
We will be stringing on Austrian crystal beads of different sizes, shapes and colors as well as some pewter beads.
In the Crystal Excitement Bracelet project...
LearnToBead Goals:
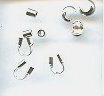
- Selecting Cable Wire, Crimp Bead, Crimp Cover, and Horseshoe Wire Protector
- The four steps of crimping
- Selecting a clasp and fashioning a "clasp assembly"
- Creating a "support system" with a loop
- Using a bead board and sizing cone
- Relationship of cable wire method to needle/thread method
Table of Contents
Supplies List
I. Planning Your Project
Choosing Clasps, Clasp Assemblies and Support Systems
Choosing Stringing Materials
IA. Conceptualizing Your Piece
IB. Measurements
IC. Selecting Materials
ID. Sketching a Pattern or Graph
IE. Identifying Potential Areas of Weakness within Your Piece
IF. Visualizing Your Process
IG. Organizing Your Work Space
II. Beginning Your Project
IIA. Basic Steps
About Cable Wires
About Crimp Beads, Crimp Covers, and Horseshoe Wire Protectors
Let's Practice Crimping
Let's Make Our Bracelet
IIB. Dealing with Contingencies
IIC. Finishing Touches
III. Summary of Learning Objectives You Have Met
After Accomplishing This Project
IV. Next Steps
IVA. Suggested Readings
| LEARNING OBJECTIVES | BEAD STRINGING CRIMPING CRYSTAL EXCITEMENT BRACELET BS1.01-Crimping |
||
| BEGINNER | INTERMEDIATE | ADVANCED | |
| TECHNICAL MECHANICS | |||
| 1. Holding Your Piece To Work It | BEGINNER | ||
| 2. Reading Simple Pattern, Figure and/or Graph; Diagramming | BEGINNER | ||
| 3. Selecting Stringing Materials | BEGINNER | ||
| 4. Selecting Clasps and other Jewelry Findings | BEGINNER | ||
| 5. Selecting Beads and other Components | BEGINNER | ||
| 6. Laying Out Your Piece | BEGINNER | ||
| 7. Identifying Areas of Potential Weakness, and Strategies for Dealing With These |
BEGINNER | ||
| 8. Selecting and Using Adhesives | |||
| 9. Use of Tools and Equipment | BEGINNER | ||
| 10. Determining Measurements and Ease, including Width and Length of a Piece, Especially In Relationship To Bead Sizes | BEGINNER | ||
| 11. Finishing Off Threads, Cable Wires or Other Stringing Materials in Piece or Adding Threads/Cable Wires/Stringing Materials | BEGINNER | ||
| UNDERSTANDING CRAFT BASIS OF STRINGING METHODS | |||
| 1. Starting the Piece | BEGINNER | ||
| 2. Implementing the Basic Method | BEGINNER | ||
| 3. Finishing Off Your Piece With A Clasp Assembly | BEGINNER | ||
| 4. Managing String/Cord/Thread/Wire Tension | BEGINNER | ||
| 5. Crimping | BEGINNER | ||
| 6. Needle/Thread Work | |||
| 7. Pearl Knotting and Putting Knots Between Beads | |||
| 8. Making Simple and Coiled Loops Using Hard Wire | |||
| 9. Making and Using Connectors; Segmenting; Directional Control | |||
| 10. Adding Dangles and Embellishments | |||
| 11. Making Multi-Strands Piece | |||
| 12. Making Twist-Strands Piece | |||
| UNDERSTANDING ART & DESIGN BASIS OF BEAD STRINGING | |||
| 1. Learning Implications When Choosing Different Sizes/Shapes of Beads, or Using Different Stringing Materials | BEGINNER | ||
| 2. Learning Implications When Choosing Different Kinds of Clasps, or Using Different Jewelry Findings and Components | BEGINNER | ||
| 3. Understanding Relationship of this Bead Stringing Method in Comparision to Other Types of Bead Stringing Methods | BEGINNER | ||
| 4. Creating Support Systems Within Your Piece In Anticipation of Effects of Movement | BEGINNER | ||
| 5. Understanding How Bead Asserts Its Need For Color When Stringing Beads | |||
| 6. Creating Your Own Design with This Bead Stringing Method, in Reference to Jewelry Design Principles of Composition | |||
| 7. Creating Shapes, Components and Forms To Use With This Bead Stringing Method, and Establishing Themes | |||
| BECOMING BEAD STRINGING ARTIST & DESIGNER | |||
| 1. Developing A Personal Style | |||
| 2. Valuing or Pricing Your Work | |||
| 3. Teaching Others Bead Stringing Methods | |||
| 4. Promoting Yourself and Your Work | |||
By completing a purchase of any of our kits and/or instructions, you agree to our terms and conditions:
1. Customers are allowed to make 3 copies of instructions for personal use
2. Permission is required from LandOfOdds.com, Be Dazzled Beads, or LearnToBead.net, when teaching for fees, with any of our projects