Categories
Categories
DARA'S BRACELET INSTRUCTIONS DOWNLOAD (1 unit)
Product Description
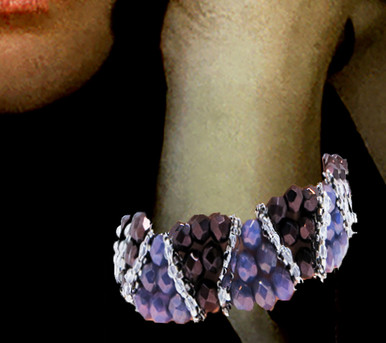
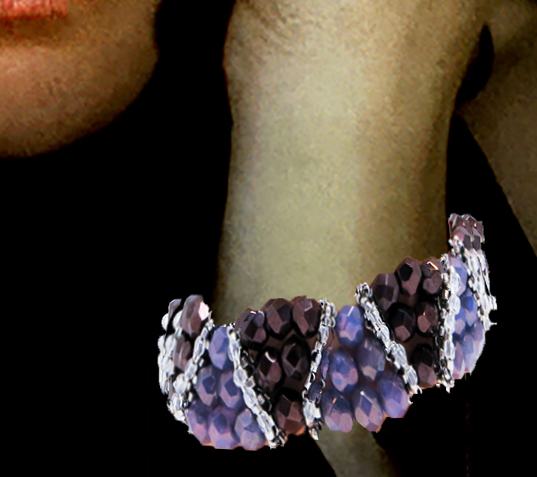
Dara's Bracelet
Designer: Warren Feld
BW2-16-DARAS
INTERMDIATE LEVEL
-- Bead Weaving Sequence
-- Lesson: Right Angle Weave, Peyote (Flat-even, Flat-odd, Tubular), Bead Stringing using needle and thread
-- Bracelet
Dara’s bracelet for her special day!
Share her excitement with bead woven separator bars separating beautiful islands of bead strung beads.
NOTE: Regular retail and wholesale store discounts do not apply to kits.
The DARA'S BRACELET KIT
Instructions to make a 6 3/4 - 7 3/4" bracelet
Supplies to make up to an 8 3/4" bracelet
|
PLEASE NOTE: Sometimes, because of erratic supplies of beads and othermaterials,
we will need to substitute something of similar color and quality.
#1: 6mm GLASS, ALEXANDRITE PALETTE
|
Colors may appear differently on different monitors.
#2: 6mm GLASS, PRAIRIE PALETTE
|
Colors may appear differently on different monitors.
FORMAT OPTONS
(1) KIT with Instructions on CD
(2) CD Instructions Only
About the Kit...
This bracelet is made up of either Czech fire polish beads or Austrian Crystal beads, strung on a cable thread, in this case Fireline brand, and secured with knots. The bracelet has a strong pattern to it, namely a series of triangular spaces. Even though coupled with an adjustable clasp assembly, the pattern limits the useful size of the bracelet. For a much smaller wrist or a much larger wrist, you would need to either remove or add a triangular space to the design.
This bracelet was originally designed for the bridesmaids in my niece Dara’s wedding. I wanted to design a bracelet that would coordinate with their dresses, but which could also be worn outside a wedding setting.
My niece had sent me photos of bracelets she had seen on Etsy and which she liked, and I adapted the design, based on her preferences. I wanted to create a strong bead woven element in the pieces, as my special signature and personalization.
Dara’s preferences focused on bead strung pieces using larger 6mm and 8mm beads. She liked things which had a very contemporary and bright feel to them. She preferred silver over gold.
I played around with ideas until I settled on this particular design. While the original pieces were a combination of sterling, palladium and Austrian crystal, I adapted less costly materials for this particular project.
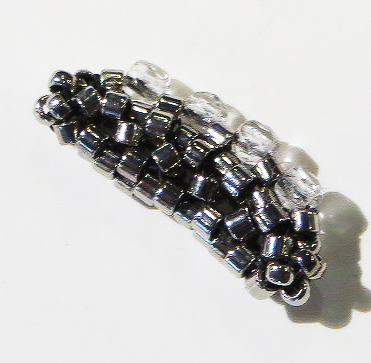
One critical key to the success of this piece has to do with the integrity of the separator bars. I had to come up with a design that allowed the components to function as “separators”, but to maintain their shape as the pieces were worn. I decided that combining two stitches – Right Angle Weave and Peyote – would allow me to meet these criteria.
In the Dara's Braceletproject...
LearnToBead Goals:
- Multi-Stitch technique for combining right angle weave and flat peyote stitches in creating a functional 5-hole separator bar
- Adding tubular peyote bead cap at either end of our separator bars
- Adding embellishment above peyote stitched row
- How to string beads using needle and thread
- Attaching a clasp assembly
TABLE OF CONTENTS
SUPPLIES LIST, p. 4
I. Planning Your Project, p. 6
Intro – Types of Choices To Be Made In This Project, p.6
MANAGING SUPPORT SYSTEMS AND OTHER ARCHITECTURAL ISSUES, p. 6
Conceptualizing
IA. Conceptualizing Your Piece, p. 7
IB. Measurement, p. 10
IC. Selecting Materials, p. 12
ID. Sketching a pattern or graph, p. 12
IE. Identifying Potential Areas of Weakness, p. 13
IF. Identifying How To Attach The Clasp, p. 13
IG. Visualizing Your Process, p. 13
IH. Organizing Your Work Space, p. 14
II. Beginning Your Project, p. 15
IIA. Basic Steps, p. 15
IIA-1. CREATE THE BEAD WOVEN SEPARATOR BARS, p. 16
IIA-2. STRING UP INTO BRACELET, p. 36
IIA-3. ATTACH THE CLASP, p. 43
IIB. Dealing with Contingencies, p. 44
IIC. Finishing Touches, p. 45
III. Summary of Learning Objectives You Have Met After Accomplishing This Project, p. 46
IV. Next Steps, p. 50
IVA. Suggested Readings, p. 50
| LEARNING OBJECTIVES BEAD WEAVING and BEAD STRINGING | DARA’S BRACEELT | ||
|
| BEGINNER | INTERMEDIATE | ADVANCED |
| TECHNICAL MECHANICS | |||
| 1. Selecting Materials | BEGINNER |
|
|
| 2. Positioning Your Fingers and Hands, and Holding Your Piece To Work It | BEGINNER |
|
|
| 3. Working with Thread, Waxing Thread, Managing Thread Tension | BEGINNER |
|
|
| 4. Finishing Off Threads in Piece or Extending by Adding Threads | BEGINNER |
|
|
| 5. Working with Beading Needles and Tools Used in Bead Weaving | BEGINNER |
|
|
| 6. Reading Simple Pattern, Figure and/or Graph |
| INTERMEDIATE |
|
| 7. Identifying Areas of Potential Weakness, and | BEGINNER |
|
|
| 8. Determining Measurements, including Width and Length of a Piece, Especially In Relationship To Bead Sizes | BEGINNER |
|
|
|
| |||
|
| |||
| UNDERSTANDING CRAFT BASIS OF STITCH | |||
| 1. Starting the Stitch |
| INTERMEDIATE |
|
| 2. Implementing the Basic Stitch |
| INTERMEDIATE |
|
| 3. Working Stitch in Flat Form |
| INTERMEDIATE |
|
| 4. Increasing and Decreasing |
|
|
|
| 5. Creating Simple Surface Embellishment |
| INTERMEDIATE |
|
| 6. Creating a Simple Edging or Fringe |
|
|
|
| 7. Finishing Off Your Piece With A Clasp Assembly |
| INTERMEDIATE |
|
| 8. Working Stitch in Tubular Form |
| INTERMEDIATE |
|
| 9. Working Stitch in Circular Form |
|
|
|
| 10. Working Stitch in Spiral Form |
|
|
|
| 11. Working Stitch in Diagonal Form |
|
|
|
| 12. Working Stitch in 3-Dimensions (sculptural or cubic) |
|
|
|
| 13. Working Stitch To Create Open (Negative Spaces), and Split Forms |
|
|
|
| 14. Embellishing the Surface of Your Piece |
|
|
|
| 15. Elaborately Embellishing the Project, including Fringes, Edge Treatments, Bails, Straps and Connectors |
|
|
|
|
| |||
|
| |||
| UNDERSTANDING ART & DESIGN BASIS OF STITCH | |||
| 1. Learning Implications When Choosing Different Sizes/Shapes of Beads, or Using Different Stringing Materials |
| INTERMEDIATE |
|
| 2. Understanding That Materials Differ in Terms of Whether They Will Mix in the Same Piece, They Will Work Well With Certain Stringing Materials, or They Will Work Well With Certain Bead Weaving Stitches |
|
|
|
| 3. Understanding Relationship of this Stitch in Comparison to Other Types of Bead Weaving Stitches |
| INTERMEDIATE |
|
| 4. Understanding How Bead (or Finding or Stringing Material) Asserts Its Need For Color, Using This Stitch |
|
|
|
| 5. Creating Your Own Design with This Stitch, in Reference to Design Elements and Jewelry Design Principles of Composition – Such as Rhythm, Orientation, Balance, Distribution, Parsimony -- Achieving Good Unity Of Purpose |
|
|
|
| 6. Creating Shapes, Components and Forms with This Stitch, and Establishing Themes |
| INTERMEDIATE |
|
| 7. Anticipating Issues of Movement, Drape, Flow, and Durability |
|
|
|
| 8. Building in Structural Supports, and Other Support Elements, into the Design |
| INTERMEDIATE |
|
| 9. Strategically Integrating 2 or More Types of Stitches Within the Same Piece |
| INTERMEDIATE |
|
|
| |||
|
| |||
| BECOMING BEAD WEAVING ARTIST | |||
| 1. Understanding Under Which Circumstances One Stitch Would Be Preferred Over Another |
| INTERMEDIATE |
|
| 2. Understanding the Architectural Foundations Underlying Each Type of Bead Weaving Stitch |
| INTERMEDIATE |
|
| 3. Taking an Experimental Approach to Project Development, Something Beyond Following A Set of Steps |
|
|
|
| 4. Able to Intentionally Control the Interplay of Light, Dark, Shadow, Reflection and Refraction |
|
|
|
| 5. Understanding How Jewelry Functions in a 3-Dimensional Space, Sensitive to Position, Volume, and Scale, Interacting with People (Wearer and Viewer), Touching Simultaneously on Aesthetic, Cultural, Social and Psychological Levels.
|
|
| |
 Loading... Please wait...