Loading... Please wait...
 Categories
Categories
COLORBLOCK BRACELET INSTRUCTIONS DOWNLOAD

)

Product Description
Kits Showcase - Land of Odds - Be Dazzled Beads
At the time I designed this ColorBlock Bracelet, I was exploring several different beading and design techniques. In our advanced study group, we had been discussing the use of components and forms. We had offered a workshop on a project called Monet’s Garden Bracelet which used a specific color blending formula, so I was intrigued with the idea of color blending and different ways for putting it into effect. Layered right angle weave was all the rage in the major beading magazines. I wanted to force myself to learn it. |


 |
Right angle weave (RAW) is a very flexible, robust stitch with a unique circular thread path. This thread path is what makes it so special. You can use any bead with RAW. You can make a basic foundation. You can layer it. You can embellish on it as well as with it. You can do it as a set of connected cubes or triangles or other geometric forms. You can start many other types of bead weaving stitches off a RAW base.
In Layered RAW, we create a foundation base. This base could have been stitched using RAW, or peyote, or square, or ladder or any number of types of stitches. This base becomes our first layer. The second layer is made up of a right angle weave-stitched embellishment.
There are many different strategies for doing this. If we visualize our RAW unit made up of 4 beads – each lying as compass points North, East, South and West, we would add and anchor two of the points to sit on top of the first layer, and have a separate weaving strategy for filling in the other two points of our RAW unit.
In this project, we add the North point, pass through a bead on the first layer, then add the South point, again passing through a bead on the first layer. We continue setting up all our North and South points on our component, from one end to the other. Then we return, working everything within the second layer, adding a West, passing through the South, adding an East and passing through the North, and returning through the West, and so forth.
Color Blending is an important design goal for this project. Your goal is to move from one color to the next, in a satisfying way. You have many different kinds of choices to make, when managing a transition like this.
After you have chosen which colors you want to use, you need to decide what the color will look like as a "base" color, and what the color might look like as a "blend" color. With paints, this task is much, much easier, than with beads. It is not easy to blend beads, not least of which is because it is difficult to find the right colors needed to merge a color from base to blend and back to the base of the next color.
In this project, our strategy is to change the proportions of the base color as we move from one component to the next two, until the proportions of the base to the blend in the first component are in reverse to the proportions to the blend to the base in the last component.
WHAT YOU WILL LEARN...
 |
In the COLORBLOCK BRACELET project, you will learn how to create a series of linked components where two colors are blended at a time, and this blending requires the positioning of beads and colors across two separate components.
You will also learn how to create a ladder-stitched base and add a 2nd bead layer using layered right angle weave.
The instructions help you...
...visualize each ladder stitch and layered right angle weave stitch patterns,
...lead you through a fun project, and
...offer many design possibilities for the bead weaving artist.
LearnToBead Goals: How to...
- Implement a 2-stack plus 1-stack ladder stitch pattern to create the foundation for each bracelet component
- Implement Layered Right Angle Weave Stitch
- Devise a Color Blending strategy based on managing the flow of color proportions, and which unfold across 2 bracelet components at a time
- Size your Bracelet in order to adapt the design to your requirements
- Understand the design implications of using "Components" in jewelry design
- Understand the architecture of the ladder and right angle weave stitches, and how the architectural requirements of each stitch enhance shape, curve, dimensionality, movement, drape, flow and durability
- Manage Thread Tension
- Read a Pattern/Creating a simple Figural Representation
- Anticipate Bead Size coordination and fit
- Finish off the edges with simple picot stitch
- Connect components and attaching clasp
My kit projects are part of our overall education program at Be Dazzled Beads in Nashville. These kits are developed within what is called The Design Perspective. The Design Perspective focuses on how the jewelry designer and bead artist make choices about...
-what to do, and not do
-what to include, and not include
-how to balance off conflicting demands between beauty and functionality.
THE COLORBLOCK BRACELET
PROJECT GUIDE BOOK
Every participant receives a Project Guide Bookwith instructions and design discussion.
 |
In the Project Guide Book, I first guide you through this project's planning process. That is, I discuss the types of choices I made, when creating this piece. These choices include things about technique, color and materials, and about form, structure and function. I discuss how I leveraged the architectural strengths of each stitch to achieve my overall goals.
Then, I go over, in detail, with many illustrations and diagrams, step-by-step, easy-to-follow instructions.
The Project Guide Book Table of Contents:
(63 pages; 3 color images; 61 color diagrams)
SUPPLIES LIST
I. Planning Your Project
Intro – Types of Choices To Be Made In This Project
ABOUT LAYERED RIGHT ANGLE WEAVE
REVIEW OF BASIC RIGHT ANGLE WEAVE STITCH
COLOR BLENDING
MANAGING SUPPORT SYSTEMS AND OTHER ARCHITECTURAL ISSUES
Conceptualizing
IA. Conceptualizing Your Piece
IB. Measurement
IC. Selecting Materials
ID. Sketching a pattern or graph
...LAYER 1, Components 1-6
...LAYER 2, Components 1-6
IE. Identifying Potential Areas of Weakness
IF. Identifying How To Attach The Clasp
IG. Visualizing Your Process
IH. Organizing Your Work Space
II. Beginning Your Project
IIA. Basic Steps
PRE-STEP: PLANNING YOUR PIECE
...PS1: MEASUREMENT AND SIZING
...PS2: COLOR BLENDING PLAN
IIA-1. CREATE COMPONENT
...1a. 2- AND 1-STACK LADDER STITCH
...1b. LAYERED RIGHT ANGLE WEAVE
IIA-2. ATTACH COMPONENTS
IIA-3. ATTACH CLASP
IIB. Dealing with Contingencies
...1. Running out of thread/adding thread
...2. Some areas are too loose
...3. Piece too long or too short
...4. Can’t get needle to pass through
IIC. Finishing Touches
III. Summary of Learning Objectives You Have Met After Accomplishing This Project
IV. Next Steps
IVA. Suggested Readings
SAMPLE INSTRUCTIONS
STEP A1.B. Creating Component FoundationAdd the 1 stack row of 2mm fire polish beads
If your thread is exiting the bottom bead of your last stack of 8/0 cut seed beads, snag a thread loop between the last and next-to-last column, so you can reverse directions, and come up through that last stack.
Your thread should now be exiting the top of your last column of 2-stack 8/0 cut seed beads.
 |  | Same as FIRST Component |
| If FIRST Component | If LAST Component | If MIDDLE COMPONENT |
Diagram B1
Pick up 2D (2mm fire polish bead).
**NOTE: Remember, we always start every ladder row with 2 beads instead of 1.
NOTE: If this is your first component,
one of those two beads is going to be your “connector” bead. The other will be the first 1-stack bead sitting above your column of 2-stack beads.
Return down through that same column of 8/0 cut seed beads you began from. Snag a thread loop to reverse directions, and come back up the 2-stack plus one of the new D beads. You are positioned to add the next 1D. NOTE: You want your 2D beads to sit next to each other, not on top of one another.
NOTE: If this is your last component,
you won’t need a “connector” bead on this side of the component. So the first 2D beads added will sit on top of your first 2-bead stacks of 8/0 cut seed beads.
Return down through the 2nd column of 8/0 cut seed beads. Come up through the previous 2-stack and first new D added, back down the second new D added. Snag a thread loop to reverse direction, and return up the 2nd stack and last D added. You are positioned to add the next 1D.
NOTE: If this is a middle component,
you will need “connector” beads on both sides of the component.
For this side, follow the directions above as for the first component.
Measurement

For this project, I wanted to make a bracelet approximately 7" (175mm) long, which includes the clasp (adds about 3/8"), and when measured around a sizing cone.
The bracelet consists of 6 components. Each component is made up of 8 rows and 10 columns.
You have three types of size adjustments you can make. First, you can add or subtract a whole component from your bracelet. Alternatively, you can add or subtract the number of bead columns within one or more components. Lastly, you can use a clasp that has a longer clasp assembly.
How you do any of these strategies is detailed in the instructions, all the time taking into account how to maintain the integrity of the color blending strategy which underlies the design of the piece.
COLORBLOCK BRACELET PROJECT
Palettes: Available in 2 palettes
Purchase in-store or on-line:
Kit with Instructions ($95.00)
Download Instructions Only ($9.99)
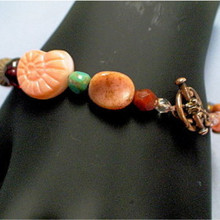
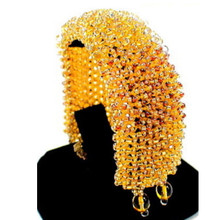
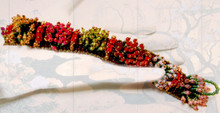
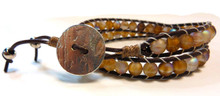
Palette #1: Raspberry Sunset Palette #2: Cool Lagoon |
With This Kit, You Will Receive...
- Step by Step instructions with text, diagrams and images- Size 8/0 hex cuts and size 11/0 seed beads
- 2mm round Czech Fire Polish Beads
- slide clasp
- Fireline cable thread
- 10ea size #12 beading needles
- Plastic case with lid for carrying these supplies
What You Will Need To Have On Hand...
- Bees wax or Microcrystalline wax
- Scissors
- Ruler, pencil and paper
- Bic lighter or thread zapper
- chain nose or flat nose pliers
- OPTIONAL: bracelet sizing cone or some way to measure your wrist
- Work Surface
- Sufficient lighting, magnification, chair cushioning, if needed
People Who Purchased COLORBLOCK BRACELET
also bought these kits...

About Warren Feld

"Jewelry Design Is A Life Lived With Wearable Art" -- Warren Feld
For Warren Feld, Jewelry Designer, beading and jewelry making endeavors have been wonderful adventures. These adventures, over the past 31 years, have taken Warren from the basics of bead stringing and bead weaving, to wire working and silver smithing, and onward to more complex jewelry designs which build on the strengths of a full range of technical skills and experiences.
He, along with his partner Jayden Alfre Jones, opened a small bead shop in downtown Nashville, Tennessee, about 30 years ago, and called it Land of Odds. Over time, Land of Odds evolved from a bricks and mortar store into a successful internet business – www.landofodds.com . In the late 1990s, Jayden and Warren opened up another bricks and mortar bead store – Be Dazzled Beads – in a trendy neighborhood of Nashville called Berry Hill. Together both businesses supply beaders and jewelry artists with all the supplies and parts they need to make beautiful pieces of wearable art.
Warren leads a group of instructors at Be Dazzled Beads. He teaches many of the bead-stringing, jewelry design as well as business-oriented courses in the curriculum. He works with people just getting started with beading and jewelry making, as well as with the program’s advanced bead study groups.
His pieces have appeared in beading and jewelry magazines and books. One of his pieces is in the Swarovski museum in Innsbruck, Austria.
LAND OF ODDS
BE DAZZLED BEADS
718 Thompson Lane, Ste 123
Nashville, Tennessee 37204
(615) 292-0610
www.bedazzledbeads.com
EMAIL: oddsian@landofodds.com
warren@bedazzledbeads.com
To add your name to our emailing list, visit our website
VIEW OUR CALENDAR SCHEDULE ONLINE
You can REGISTER FOR CLASSES ONLINE,
as well as in the shop or by phone.
Explore all of our bead weaving, bead stringing and jewelry design kits!

Join our NASHVILLE BEADING AND JEWELRY DESIGN  GROUP on line
to get announcements about our Wednesday afternoons
and once-a-month Saturday beading/jewelry making get-togethers.
No fees.
| THE JEWELRY DESIGN DISCUSSION GROUP
|