Loading... Please wait...
 Categories
Categories
WHAT HAPPENS NEXT BRACELET INSTRUCTIONS DOWNLOAD, (1 unit)

, $9.99 (https://landofodds.com/what-happens-next-bracelet-instructions-download-1-unit/))

Product Description
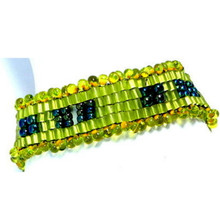
WHAT HAPPENS NEXT Bracelet
Designed by: Warren Feld
CBJA-BW1-PEY-01
BEGINNER LEVEL / REFRESHER
-- Bead Weaving Sequence
-- Lesson: Even Count, Flat Peyote
-- Bracelet
A fun way to learn simple flat, even-count peyote, as you explore what happens when you vary bead shapes, sizes, and patterns.
NOTE: Regular retail and wholesale store discounts do not apply to kits.
The WHAT HAPPENS NEXT BRACELET
Instructions to make a 7" bracelet
No Kit.
Supplies Needed:
2 colors of 10/0 delicas
2 colors of 11/0 delicas
2 colors of 15/0 seed beads
2 colors of 11/0 seed beads
2 colors of 8/0 seed beads
Nymo Thread, size D or C-Lon Thread size D
Clasp
Bees Wax or Microcrystalline Wax
Beading Needles, Size #12
FORMAT OPTONS
(1) Instructions Digital Download
About the Project...
Peyote stitch is a pattern used to weave beads together using a needle and thread. Depending on the stitch technique that is used, the resulting woven pieces could be flat strips, tubes, or flat round shapes, and can be used to create bags, jewelry, images, and other decorative elements. This project teaches you how to do the peyote stitch when you begin with an even number of beads, and your composition is flat.
The stitch pattern takes a slightly different form when you begin with an odd number of beads. And there is a slight variation when stitching peyote in the round or tubular shape. This project does not touch on these variations.
In the flat, even-count peyote stitch, you pick up an even number of beads. This “foundation” row of beads is actually your first two peyote rows. You then pick up one bead, skip over an existing bead, and pass through the next bead in the previous row.
You continue all the way across until you have created what is called a “peyote zipper.” You will see that every other bead will protrude up from the one previous to it. We always want to get the beads in this zipper tightly abutted together. Then you continue this weaving pattern: pick up a bead, pass through the next protruding bead, pick up a bead and pass through the next protruding bead, and so forth.
In this project, about every inch, I change up something about the beads you are using – their shape or size --, when you peyote. This gives you a sense of “What Happens Next.”
In the WHAT HAPPENS NEXT Bracelet project...
LearnToBead Goals:
- Basics of Flat, Even Count Peyote Stitch
--- How to hold your piece while working it
--- How to create a Peyote "zipper", that is the foundation rows 1 and 2
--- How to count peyote rows
--- How to vary the stitch to get different textures, patterns and more dimensionality
--- How to decrease and increase in peyote
--- How to add a simple picot edge embellishment
--- How to add thread
--- How to finish off your piece
--- How to add a clasp
TABLE OF CONTENTS
This set of instructions is organized as a series of
Jewelry Design Choices:
SUPPLIES LIST
Section 1: Alternating Colors, Cylinder Shape
Adding a Stop Bead
Counting Peyote Rows
Section 2: One Decrease
Section 3: Reduce Bead Size, Cylinder Shape
Section 4: Change Bead Shape, Seed Beads
Section 5: Alternate Bead Sizes within Same Row, Seed Beads
Section 6: Alternate Bead Sizes from Row To Row, Seed Beads
Repeat ….
Section 7: One Increase
Repeat ….
Edging
Attach Clasp
Running Our of Thread/Adding Thread/ Snagging Thread-Loop
| LEARNING OBJECTIVES | WHAT HAPPENS NEXT BRACELET | ||
| BEGINNER | INTERMEDIATE | ADVANCED | |
| TECHNICAL MECHANICS | |||
| 1. Managing Thread Tension | BEGINNER | ||
| 2. Holding Your Piece To Work It | BEGINNER | ||
| 3. Reading Simple Pattern, Figure and/or Graph | BEGINNER | ||
| 4. Selecting Materials | BEGINNER | ||
| 5. Identifying Areas of Potential Weakness, and Strategies for Dealing With These | BEGINNER | ||
| 6. Determining Measurements, including Width and Length of a Piece, Especially In Relationship To Bead Sizes | BEGINNER | ||
| 7. Finishing Off Threads in Piece or Adding Threads | BEGINNER | ||
| UNDERSTANDING CRAFT BASIS OF STITCH | |||
| 1. Starting the Stitch | BEGINNER | ||
| 2. Implementing the Basic Stitch | BEGINNER | ||
| 3. Finishing Off Your Piece With A Clasp Assembly | BEGINNER | ||
| 4. Creating Simple Surface Embellishment | |||
| 5. Increasing and Decreasing | BEGINNER | ||
| 6. Working Stitch in Tubular Form | |||
| 7. Working Stitch To Create Open (Negative Spaces), and Split Forms | |||
| 8. Elaborately Embellishing the Stitch, including Fringes, Edge Treatments, Straps and Connectors | |||
| 9. Working Stitch in Circular Form | |||
| 10. Working Stitch in 3-Dimensions | |||
| UNDERSTANDING ART & DESIGN BASIS OF STITCH | |||
| 1. Learning Implications When Choosing Different Sizes/Shapes of Beads, or Using Different Stringing Materials | BEGINNER | ||
| 2. Understanding Relationship of this Stitch in Comparision to Other Types of Bead Weaving/Bead Stringing Stitches | |||
| 3. Understanding How Bead Asserts Its Need For Color, Using This Stitch | |||
| 4. Creating Your Own Design with This Stitch, in Reference to Jewelry Design Principles of Composition | |||
| 5. Creating Shapes, Components and Forms with This Stitch, and Establishing Themes | |||
| BECOMING BEAD WEAVING ARTIST | |||
| 1. Developing A Personal Style | |||
| 2. Valuing or Pricing Your Work | |||
| 3. Teaching Others The Stitch | |||
By completing a purchase of any of our kits and/or instructions, you agree to our terms and conditions:
1. Customers are allowed to make 3 copies of instructions for personal use
2. Permission is required from LandOfOdds.com, Be Dazzled Beads, or LearnToBead.net, when teaching for fees, with any of our projects