Loading... Please wait...
 Categories
Categories
CURVY RIGHT ANGLE WEAVE BRACELET INSTRUCTIONS DOWNLOAD, (1 unit)

, $9.99 (https://landofodds.com/curvy-right-angle-weave-bracelet-instructions-download-1-unit/))

Product Description
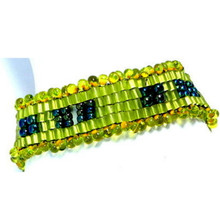
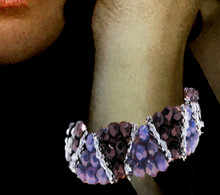
CURVY Bracelet - ORDER INSTRUCTIONS
Designer: Warren Feld
CBJA-BW1-PEY-01
BEGINNER LEVEL / REFRESHER
-- Bead Weaving Sequence
-- Lesson: Right Angle Weave
-- Bracelet
Liven up your Right Angle Weave bracelet with some “Curvy” action. Learn the basic RAW stitch.
NOTE: Regular retail and wholesale store discounts do not apply to kits.
The CURVY BRACELET KIT
Instructions to make a 7" bracelet
- Step by Step instructions on CD
with text, diagrams and images
What You Will Need To Have On Hand...
- Japanese size 6/0, size 8/0, size 11/0 seed beads
- clasp
- FireLine size D (.008", 6#)
- size #12 beading needles
- Bees wax or microcrystalline wax
- Scissors
- Ruler, pencil and paper
- Work Surface
- Bic lighter or thread zapper
- bracelet sizing cone or some way to measure your wrist
- Sufficient lighting, magnification, chair cushioning, if needed

FORMAT OPTONS
(1) Instructions Digital Download
About the Project...
The Right Angle Weave Stitch is very popular because of its architectural, building-block like features. The stitch path follows a Figure 8 configuration, where you first pursue the Figure 8 path in an upward then downward motion, and next continue the figure 8 in a downward then upward motion, and then repeat. This can get a little confusing when you first learn the stitch.
In our project here, we not only embellish the top of our RAW row, but we add edging embellishment to force the row to curve.
Whenever you create a piece of jewelry, it is important to try to anticipate how your choice of techniques and materials might positively or negatively affect how the piece moves and feels when worn, as well as your piece’s overall durability.
Towards this end, it is important to redefine your techniques and materials in architectural terms. The important term or concept we think about when we begin our piece is called a “Support System”. A support system is anything that gives your piece “jointedness”, that is, allows the piece to move easily when worn, and allows the piece to adapt to the negative forces any movement places on your piece, making your piece feel more comfortable to wear and more durable.
In our Right Angle Weave project, we need to understand how the Right Angle Weave stitch provides support.
In RAW, we create a RAW unit, usually consisting of 4 beads, and we connect this unit to the subsequent unit, through a shared bead. It is important that the beads within the single unit move as “one.” That means, we need to get them as tightly abutted against each other as possible.
When using bicone beads, for example, this is relatively easy. The bead shapes make them lock up tightly. But when using round beads, such as in this project, the beads do not lock up. In this project, we rely on our surface and edge embellishments to tighten things up.
In our shared bead, however, we want a looser connection to the next RAW unit.
We want our RAW units to move somewhat together, yet somewhat independently, in order to adequately adapt to the forces of movement as our bracelet is worn.
In this bracelet, we will be make a 6 ½” strip of RAW units. When we add a clasp, this will make the bracelet fit comfortably around a 7” wrist. The instructions detail steps for making a bracelet for a 7” wrist.
To make a shorter bracelet, say for a 6” wrist, we would use fewer RAW units. To make a longer bracelet, say for a 7 ½” wrist, we would add more RAW units.
In the CURVY Braceletproject...
LearnToBead Goals:
- Basics of Right Angle Weave
--- How to hold your piece while working it
--- How to create a Basic Right Angle Weave Unit
--- How to add simple surface embellishment
--- How to add a simple edge
--- How to force RAW row to curve
--- How to add thread
--- How to finish off your piece
--- How to add a button clasp and bead woven loop
TABLE OF CONTENTS
This set of instructions is organized as a series of
Jewelry Design Choices:
SUPPLIES LIST
1. Create Row of Basic Right Angle Weave (RAW) Units
About adding thread
2. Criss-Cross Surface Embellishment
3. Edge Embellishment
4.Test Bracelet Size
5. Add Button Clasp with Loop
| LEARNING OBJECTIVES | RIGHT ANGLE WEAVE BRACELET | ||
| BEGINNER | INTERMEDIATE | ADVANCED | |
| TECHNICAL MECHANICS | |||
| 1. Managing Thread Tension | BEGINNER | ||
| 2. Holding Your Piece To Work It | BEGINNER | ||
| 3. Reading Simple Pattern, Figure and/or Graph | BEGINNER | ||
| 4. Selecting Materials | BEGINNER | ||
| 5. Identifying Areas of Potential Weakness, and Strategies for Dealing With These | BEGINNER | ||
| 6. Determining Measurements, including Width and Length of a Piece, Especially In Relationship To Bead Sizes | BEGINNER | ||
| 7. Finishing Off Threads in Piece or Adding Threads | BEGINNER | ||
| UNDERSTANDING CRAFT BASIS OF STITCH | |||
| 1. Starting the Stitch | BEGINNER | ||
| 2. Implementing the Basic Stitch | BEGINNER | ||
| 3. Finishing Off Your Piece With A Clasp Assembly | BEGINNER | ||
| 4. Creating Simple Surface Embellishment | BEGINNER | ||
| 5. Increasing and Decreasing | |||
| 6. Working Stitch in Tubular Form | |||
| 7. Working Stitch To Create Open (Negative Spaces), and Split Forms | BEGINNER | ||
| 8. Elaborately Embellishing the Stitch, including Fringes, Edge Treatments, Straps and Connectors | |||
| 9. Working Stitch in Circular Form | |||
| 10. Working Stitch in 3-Dimensions | |||
| UNDERSTANDING ART & DESIGN BASIS OF STITCH | |||
| 1. Learning Implications When Choosing Different Sizes/Shapes of Beads, or Using Different Stringing Materials | BEGINNER | ||
| 2. Understanding Relationship of this Stitch in Comparision to Other Types of Bead Weaving/Bead Stringing Stitches | |||
| 3. Understanding How Bead Asserts Its Need For Color, Using This Stitch | |||
| 4. Creating Your Own Design with This Stitch, in Reference to Jewelry Design Principles of Composition | |||
| 5. Creating Shapes, Components and Forms with This Stitch, and Establishing Themes | |||
| BECOMING BEAD WEAVING ARTIST | |||
| 1. Developing A Personal Style | |||
| 2. Valuing or Pricing Your Work | |||
| 3. Teaching Others The Stitch | |||
1. Customers are allowed to make 3 copies of instructions for personal use
2. Permission is required from LandOfOdds.com, Be Dazzled Beads, or LearnToBead.net, when teaching for fees, with any of our projects