Loading... Please wait...
 Categories
Categories
DRAGON LION (YON SATZ JA) BRACELET KIT

 BRACELET KIT, $70.00 (https://landofodds.com/dragon-lion-yon-satz-ja-bracelet-kit/))

Product Description
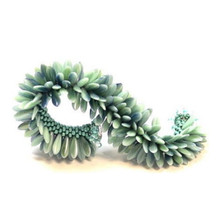
DRAGON LION (YON SATZ JA) Bracelet
Designer: Warren Feld
BW1-DLB-10-PEYOTE
ADVANCED BEGINNER LEVEL
-- Bead Weaving Sequence
-- Lesson: PEYOTE, Brick Stitch Edging, Attaching Bead-Slide Clasp
-- Bracelet
Chase away the evil spirits and welcome prosperous times with this Korean-inspired Dragon Lion bracelet. Learn even count flat peyote, how to create a stepping stone bridge, how to prepare peyote for adding a slide clasp, and adding a brick-stitch edging.
The DRAGON LION (YON SATZ JA) BRACELET KIT
Instructions to make a 6 1/2" bracelet
Supplies to make up to an 8" bracelet
|
PLEASE NOTE: Sometimes, because of erratic supplies of beads and other materials,
we will need to substitute something of similar color and quality.
FORMAT OPTONS
(1) KIT with Instructions on CD
(2) CD Instructions Only
ABOUT THE KIT
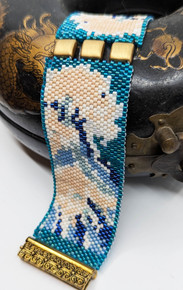
I have been collecting Korean Celadon Pottery for a while. I’m very attracted to the colors used in these pieces: celadon green, navy blue, light pinks and barely pinks and whites, some teals. I began this project by wanting to use these colors in a piece.
To find additional inspiration, I searched the web for Korean paintings / drawings / wood prints. I came across this wood block print of the sea:

I knew I wanted to do a peyote stitched piece. I have a lot of kits for sale out there, but none use the peyote stitch. I envisioned a bracelet approximately 1” wide and 7” long.
I used an online bead charting application, inputting this image and generating a peyote pattern. In generating the pattern, I tried to reduce this entire image to the 1x7” dimensions. This squished the image. Not acceptable. I played around with trying to capture different parts of the image. Capturing only the big wave in the top left of the image gave me something to work with.
I downloaded some peyote graph paper, got out my colored pencil set, and, using a combination of what the bead chart program had generated, and my own artistic sensibilities, I kept creating something, revising it, revising again, then again, and many times to get close to the finished project.
I stitched a sample. It encapsulated the general image, but none of the strength and energy and forcefulness you can see in the original image.
Some more coloring. The wave began to look more animalistic. I adjusted the graph to delineate a mouth, a chin, an eye, and more sense of the object coming alive.
The piece was now one long 1x7” panel with the “heads” at either end, rather than in the middle.
I am a strong believer in that the jewelry we create today must have elements strongly underlying what we would refer to as contemporary design. Two of these design elements are (1) a sense of dimensionality, and (2) a sense of movement. After a LOT of trial and error with different strategies for adding dimensionality, I settle on splitting the long panel into two short ones and connecting them with curved tiles called fixer beads, which adds slight elevation and a curved contrast to the flat peyote. Movement is achieved by the juxtaposition of colors and giving, as best I can, some life to the dragon lion animations.
Last, I wanted to use a bead-slide clasp on this piece. Originally, this type of clasp was too plain, simple and ugly. But there are now beautifully designed choices available. They are simple to use, do not take up much volume, so they enhance and do not compete with the general design. However, these clasps are designed to be used with loomed pieces or anything with a squared end. The peyote has a zippered up-and-down end. So I have introduced a way to square off the end allowing you to easily slide this clasp over the edge and into place.
In the Dragon Lion (Yon Satz Ja) Bracelet project...
What You Will Learn:
What You Will Learn:
- Even Count Flat Peyote
- Connecting two peyote panels
- Preparing the end of the peyote panel to get a straight edge necessary for using a slide clasp
- Brick Stitch edging
- Reading simple diagrams
TABLE OF CONTENTS
SUPPLIES LIST
I. Inspiration and Planning Your Project
IA. Measurements
IB. Selecting Materials
IC. Sketching a Pattern or Graph
ID. Identifying Potential Areas of Weakness within Your Piece
IE. Managing Structure and Support Systems
IF. Visualizing Your Process
IG. Organizing Your Work Space
II. Beginning Your Project: Basic Steps
1) Reading The Pattern / Counting Peyote Rows
2) Begin Even Count Flat Peyote and ‘Zipper’
- Ending and Adding Thread
3) Completing Panel One
4) Completing Panel Two
5) The Stepping Stone Bridge: Connecting The Panels
6) Preparing Ends of Peyote Panels and Adding Slide Clasp
7) Brick Stitch Edging
8) Give Your Piece The Once-Over