Categories
Categories
JAPANESE GARDEN BRACELET (1 kit with instructions on CD)
Product Description
Kits Showcase - Land of Odds - Be Dazzled Beads
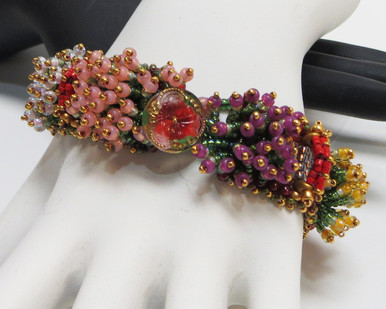
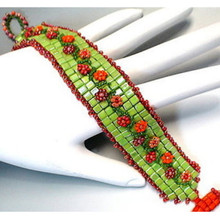
The Japanese Garden Bracelet is a fun project that students love. It is for students who have some familiarity with bead weaving. |
 |  |
| Flower Garden | Tea Garden |
ABOUT THE JAPANESE GARDEN BRACELET PROJECT
 |
For the project we are doing here, I wanted to make a woman's bracelet, about 7" (about 175mm long) (including the clasp) long and about 3/4" (20mm) wide, and which has a comfortable fit on the wrist, but not overly loose. This is a casual piece. The Japanese Garden Bracelet consists of a square stitch base and fringe off the base. When you add the fringe and border, it has the effect of arching, thus narrowing the width of, the base. And when you add the edging, it has the effect of widening the base, and canceling out any narrowing effect that results from adding the fringe and border.
In this project, the foundation base serves a very integrative function with it’s embellishment. The foundation base has areas with dichroic glass to mirror reflective ponds. The points on the foundation base where the bridges are anchored to the piece emphasize a built-in, strong support system.
I chose colors which mirrored the flower colors in pictures of Japanese gardens. I arranged them in a pleasing way, but no more involved strategy beyond that.
Japanese gardens are designed to express their cultural values and philosophies. The gardens express the fragility of existence as well as time’s unstoppable advance. In this garden landscape we see the red moon bridge over a glistening pond of water surrounded by flowering shrubs, trees and plants.
In a fragrance garden, commonly used Japanese garden plants that unfurl flowers include peony, chrysanthemum and, near water features, Japanese water iris. Flowering shrubs include azalea, camellia and hydrangea, all of which provide strong winter interest.
Traditional Japanese tea gardens were divided into two distinct areas separated by a simple barrier, like a bamboo gate or a moss-covered rock wall, with an opening to walk through. The first part of the garden was meant to entice--to create a mood of anticipation for the coming ceremony. The roji might be set with stepping stones or raised wooden planks flanked on either side by a garden pool filled with koi. The outer garden would generally be filled with an ornamental tree, a few shrubs and plants, and a water element such as a waterfall, small garden pond or pool.
We feel that each plant, walkway, stone and other related elements have been deliberately placed, some shaped and others allowed to grow at will. Japanese gardens are designed to express their cultural values and philosophies. The gardens express the fragility of existence as well as time’s unstoppable advance. I believe the Japanese Garden Bracelets captures all this.
It is important, I believe, for a contemporary piece of jewelry to have a sense of dimensionality, movement, and a strong use of color. In contemporary pieces, we also want some sense of the violation of straight lines and flat planes.
The instructions detail the choice options in selecting colors, selecting shapes and selecting thread. Not every color will work. Not every shape will work. Not every strategy for combining colors/shapes will work. Not every thread will work. I do a lot of "think-alouds" when writing instructions, so that you can follow my thinking in making the final choices among all these options.
WHAT YOU WILL LEARN...
 |
In the JAPANESE GARDEN BRACELET project, you will learn how to create a design which integrates foundation base and top fringe embellishment. You will also learn how to create a parabolic arch shape which will maintain its shape and structure while the bracelet is worn.
The instructions help you...
...visualize each stitch pattern,
...lead you through a fun project, and
...offer many design possibilities for the bead weaving artist.
LearnToBead Goals: How to...
- Select appropriate beads and thread for creating fringe
- Relate color choices to an image taken from nature
- Create a square stitch base
- Integrate pattern of base with pattern for top embellishment
- Create fringe
- Using the ladder stitch, design a parabolic arch to function as a bridge
- Embellish edges along your square stitch base using a book binding stitch
- Add a button clasp with loop
My kit projects are part of our overall education program at Be Dazzled Beads in Nashville. These kits are developed within what is called The Design Perspective.
The Design Perspective focuses on how the jewelry designer and bead artist make choices about...
-what to do, and not do
-what to include, and not include
-how to balance off conflicting demands between beauty and functionality.
THE JAPANESE GARDEN BRACELET
PROJECT GUIDE BOOK
Every participant receives a Project Guide Bookwith instructions and design discussion.
 |
In the Project Guide Book, I first guide you through this project's planning process. That is, I discuss the types of choices I made, when creating this piece. These choices include things about technique, color and materials, and about form, structure and function. I discuss how I leveraged the architectural strengths of each stitch to achieve my overall goals.
Then, I go over, in detail, with many illustrations and diagrams, step-by-step, easy-to-follow instructions.
The Project Guide Book Table of Contents:
(76 pages; 72 color images; 40 color diagrams)
SUPPLIES LIST
I. Planning Your Project
IA. Conceptualizing Your Piece
MANAGING SUPPORT SYSTEMS AND OTHER ARCHITECTURAL ISSUES
IB. Measurements
IC. Selecting Materials
ID. Sketching a Pattern or Graph
IE. Identifying Potential Areas of Weakness within Your Piece
IF. Visualizing Your Process
IG. Organizing Your Work Space
II. Beginning Your Project
IIA. Basic Steps
1. Create Square Stitch Base
GARDEN FLOOR PATTERN MAP
Square Stitch Instructions
2. Add Fringe (Flower Stalks) off top of base
GARDEN FLOWERS AND BRIDGES PATTERN MAP
3. Add Bridge
4. Continue adding flowers and bridges along the base
5. Add 3-bead-book-binding edging on both sides of base
6. Add Button Clasp and Loop
IIB. Dealing with Contingencies
1. Running out of thread – Adding Thread -- Finishing Off The End Of Your Thread
2. Some areas of your piece feel too loose, or are pulling apart
3. Your piece is too short or too long
4. You accidentally made one of the shorter fringes too long
IIC. Finishing Touches, p.
III. Summary of Learning Objectives You Have Met After Accomplishing This Project, p.
IV. Next Steps, p.
SAMPLE INSTRUCTIONS
STEP 10: Adding first flower stalks in first row

Look at the first row in the GARDEN FLOWERS AND BRIDGES PATTERN MAP
You will see we will be adding a 4-bead-stallk fringe for the first and last fringes, and 6-bead-stalk fringes for the middle five fringes. The stalks are made up of 3 shades of 11/0 seed beads.
In the 4-bead-stalk, we pick up 2 dark, 1 medium and 1 light 11/0 seed bead.
In the 6-bead-stlk, we pick up 3 dark, 2 medium and 1 light 11/0 seed bead.
The flower top (8/0 seed bead) will be COLOR J, topped by a 15/0 seed bead (COLOR I).

Begin with a new thread. Cut 6-7’ length of thread. Wax the thread.
Anchor the thread into the Garden Floor, and maneuver so your thread is exiting between the 1st and 2nd bead in Row 1.
Towards this end, bring your thread all the way through the second row of 8 beads on your square-stitched strip. Leave a 6" tail. Snag the thread loop between this 1st and the 2nd row. Tie a knot. Snag that loop again. Tie a second knot.
Bring your thread back through the 1st bead of the first row, so that it is exiting between the 1st and 2nd bead on this row.
There are seven flower fringes.
The first and last fringes have 4-bead-stalks.
The middle five fringes have 6-bead-stalks.
Pick up:
2G (dark)
1F (medium)
1E (light)
1J (first flower color)
1I (15/0 stop bead).
Slide these down toward the Garden Floor

Measurement

For this project, I wanted to make a bracelet approximately 7" (175mm) long, which includes the clasp. In this case, the clasp adds 1/4" to the piece, so that the square-stitched area is about 6 3/4" long. It is important to use an even number of beads to create each base row. In this case, I use 8 beads.
There are approximately 8-9 rows of 8/0 seed beads per inch in the base.
JAPANESE GARDEN BRACELET PROJECT
Palettes: Available in 2 palettes
Palette #1: Fragrance Garden

Palette #2: Tea Garden

With This Kit, You Will Receive...
- Step by Step instructions with text, diagrams and images
- Several colors of Japanese 11/0, 15/0 and 8/0 seed beads
- One color of O-beads
- One color of superduo beads
- ONE-G nylon beading thread
- size #10 and size #12 English beading needles
- one size 6 (14mm) designer button
- Plastic case with lid for carrying these supplies
What You Will Need To Have On Hand...
- Bees wax or microcrystalline wax
- Scissors
- Ruler, pencil and paper
- Work Surface
- Bic lighter or thread zapper
- chain nose or flat nose pliers
- bead reamer
- bracelet sizing cone or some way to measure your wrist
- Sufficient lighting, magnification, chair cushioning, if needed
People Who Purchased JAPANESE GARDEN BRACELET
also bought these kits...

BezelWorks Pendant with Bail and Strap

Cobblestones Bracelet

Gwynian Ropes Bracelet
About Warren Feld

"Jewelry Design Is A Life Lived With Wearable Art" -- Warren Feld
For Warren Feld, Jewelry Designer, beading and jewelry making endeavors have been wonderful adventures. These adventures, over the past 31 years, have taken Warren from the basics of bead stringing and bead weaving, to wire working and silver smithing, and onward to more complex jewelry designs which build on the strengths of a full range of technical skills and experiences.
He, along with his partner Jayden Alfre Jones, opened a small bead shop in downtown Nashville, Tennessee, about 30 years ago, and called it Land of Odds. Over time, Land of Odds evolved from a bricks and mortar store into a successful internet business – www.landofodds.com . In the late 1990s, Jayden and Warren opened up another bricks and mortar bead store – Be Dazzled Beads – in a trendy neighborhood of Nashville called Berry Hill. Together both businesses supply beaders and jewelry artists with all the supplies and parts they need to make beautiful pieces of wearable art.
Warren leads a group of instructors at Be Dazzled Beads. He teaches many of the bead-stringing, jewelry design as well as business-oriented courses in the curriculum. He works with people just getting started with beading and jewelry making, as well as with the program’s advanced bead study groups.
His pieces have appeared in beading and jewelry magazines and books. One of his pieces is in the Swarovski museum in Innsbruck, Austria.
LAND OF ODDS
BE DAZZLED BEADS Jewelry Design Center 718 Thompson Lane, Ste 123
Nashville, Tennessee 37204
(615) 292-0610
www.bedazzledbeads.com
EMAIL: oddsian@landofodds.com
warren@bedazzledbeads.com
To add your name to our emailing list, visit our website
VIEW OUR CALENDAR SCHEDULE ONLINE You can REGISTER FOR CLASSES ONLINE,
as well as in the shop or by phone. Explore all of our bead weaving, bead stringing and jewelry design kits!

Join our NASHVILLE BEADING AND JEWELRY DESIGN
 GROUP on line
to get announcements about our Wednesday afternoons
and once-a-month Saturday beading/jewelry making get-togethers.
No fees.
THE JEWELRY DESIGN DISCUSSION GROUP
Please join our group on facebook at:
https://www.facebook.com/groups/jewelrydesign/
 Loading... Please wait...